Learning Unity 2D
Embarking on my 2D Game Development journey in Unity, here’s a summary for my future self of what I’ve learned. Scroll to the end to see the results.
Fundamentals:
GameObjects are the fundamental objects in Unity. These GameObjects have Components like Transform which are already present, and other Components like RigidBody can be added to them.
Scripts
Scripts are another component in Unity. You can add them to objects to control their behavior. There are other useful things you can do with scripts such as to get a component for behaviour modification:
1
var component = this.GetComponent<T>(); // T is the type of the component
Scene and Camera
The Scene is the super parent of everything. The Main Camera is the entity that sees what we see. You can adjust your camera position from the Unity editor or use scripts to position the camera.
Layers
Since we are making 2D games, to control the layer of sprite rendering, we should use layers. The higher-numbered layer is rendered on top of a lower-numbered layer.
Assets
The assets folder should ideally contain all the game assets like sprites, music, etc. Sprites are the images rendered in Unity; they can have animations and more.
Collisions and Triggers
Collison detection in unity happens with the help of colliders, you need to add colliders to the game objects. Whenever there is a collision between two colliders in the game, an event is emitted. We primarily use the following two collision methods:
1
2
3
4
5
6
OnCollisionEnter2(Collision2D other) {}
OnCollisonExit2D(Collision2D other) {}

// Triggers
OnTriggerExit2D(Collider2D other) {}
OnTriggerEnter2D(Collider2D other) {}
Sometimes you dont want to have collision but just detect a collison, in such cases you can make the collider as trigger. Triggers help in detecting the collisions.
Tags
You can create tags like player, ground, tree, house etc and assing the tags to the game object, which you can later use in scripts to define consistent logic.
1
2
3
4
5
6
7
8
void OnTriggerEnter2D(Collider2D other)
{
    if (other.tag == "Boost")
    {
        Debug.Log("package entered the trigger");
        currSpeed = boostSpeed;
    }
}
Inputs
Inputs in unity is taken care by the input class
1
2
3
4
UnityEngine.Input

Input.GetAxis("Horizonatal");
Input.GetAxis("Vertical");
The GetAxis method is used to get the value on that axis, making the input method agnostic, like keyboard, joystick, mouse, etc.
Time.deltaTime
The Unity engine runs in a loop, and in each loop, the Update is called. Usually, whatever updates you want to perform on the GameObject, you do it in the Update method.
1
2
3
4
5
void Update()
{
    this.speed += Input.GetAxis("Vertical") * currSpeed;
}
But this is not frame independant. For faster machines the Update will be called more frequently per frame than for slower machines. To make it framework independant, we should use Time.deltaTime, it gives the amount of time passed since last timeframe.
1
2
3
4
5
void Update()
{
    this.speed += Input.GetAxis("Vertical") * currSpeed * Time.deltaTime; // This code is frame rate independant
}
Destroying Object
To destroy the objects you can call the Destroy method, with a delay:
1
2
3
4
5
6
7
8
9
10
void OnTriggerEnter2D(Collider2D other)
{
    if (other.tag == "Package")
    {
        Debug.Log("car collided with the package the trigger");
        Destroy(other.gameObject, 0.1f);

    }
}
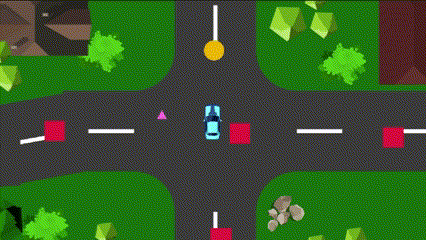
Creating The Game
Now that we have all the essential components in place, let’s walk through the steps to craft a basic 2D delivery system for cars game:
- Initiate a 2D Game:
- Begin by creating a new 2D game project in Unity.
- Import and Design Assets:
- Bring life to your game by importing diverse assets, including road elements, trees, houses, rocks, and any other visual elements crucial to your game’s ambiance.
- Use these assets to craft visually appealing layouts that define the landscape your players will navigate.
- Implement Colliders on Obstacles:
- Enhance the interactive experience by adding colliders to key assets such as houses, rocks, and trees. These colliders act as barriers, creating obstacles that the car must navigate around.
- Integrate the Player’s Car:
- Import your chosen car model into the game and augment it with a rigid body and colliders. The rigid body imparts realistic physics to the car, while colliders ensure precise collision detection.
- Create Deliverable Packages:
- Introduce packages that the player’s car will transport. Attach colliders to these packages, configuring them as triggers. This setup allows the game to detect when the car interacts with or collects the packages.
- Implement Control Scripts:
- Develop scripts to govern the car’s movement, control the camera’s attachment to the car, and establish a scoring system. These scripts bring functionality to your game, dictating how the player interacts with the environment and determining their success.
- Enjoy the Game
- Happy Coding